Access to the Internet is no longer restricted to personal computers, you can connect game systems (XBOX 360, Playstation 3, Nintendo Wii), you can connect blue ray players and watch movies transmitted over the internet, you can tether your cell phone to use your home internet and browse web sites, your iTouch can wirelessly connect to the Internet, the list goes on. Their is no 100% guaranteed way to protect all of these devices at all times from all explicit or harmful content that may exist other than turning them all off or never having them.
However, it is possible to filter out known hazards and setting up your computer with a filter takes minutes to do.
There are programs you can install on your computer like NetNanny which will protect that machine only, but you would have to find software for each device connecting to the Internet to use that method. Most modern setups for Internet access will have what is called a network router, all devices within your home, that use the same internet service, will connect to this common device. It is here at the router that the filter will be the most effective, essentially limiting and protecting all devices that may make Internet requests. I use Comcast for my Internet service and have a cheap Microsoft router for my home network.
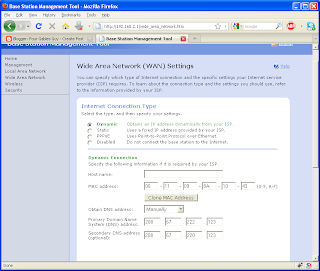
If you only have one device in your home on the Internet OpenDNS Family Shield will also work for it and it is even less complex to setup. Go here: http://www.opendns.com/start and click sign up under the "OpenDNS Basic" option. Follow the steps to change your DNS on your router or computer. Essentially I needed to change my routers DNS settings from automatic to manual and give these two DNS server IP addresses:
- 208.67.222.222
- 208.67.220.220
 There is a test page as part of the setup guide openDNS provides that will show you if you are successful in changing the DNS servers to openDNS. Routers will have passwords to protect them from being configured, when you try to configure your router, you will be prompted to login, if the password has never been set, it will be a factory password like user: admin password: admin or even blank; each brand is different. If you cannot login to the router because you forgot or never knew the password, then you may have to reset the router by holding down a button on the actual router device. This will clear all settings and you may have to reconfigure the router just to get back on the Internet again, get your internet service provider on the phone to help you do this or recruit a local tech to help out.
If you are still following along the setup and got the successful page, you should be able to click to open the OpenDNS Dashboard. If you ran into problems getting the test page to report success, try restarting your computer first then check the test page again, if still not working try restarting the router. If still not working, try the single-computer-only setup instructions. If still having trouble, recruit a local computer savvy individual to help you.
Once successful, the openDNS success page will have a link to launch the OpenDNS Dashboard, do it! In here you need to click Settings and add your IP address as a named network, it will already be filled in and you just click "add this network" and give it the name "Home". On that same settings tab, click the link to download an important program to keep your computer protected, the link is at the bottom near the text
Keep your network's IP up-to-date with our free software.
If you use Windows Operating system, click Windows link for the Windows version of the software, if you use Mac click the Mac link. Run the program to install the IP updater software, this is critical for most Internet connections because your dynamic IP address will change periodically and OpenDNS has to associate your Internet filter preferences with your ever-changing IP address. If you have paid for a static IP address, you don't need the IP updater software.

Again on the settings tab, click the dropdown box for your networks, pick the named network called "Home" you created earlier. On the left you can pick "Web Content Filtering" and select how locked down you want the Internet, some preconfigured options are categorized as High, Med, Low. It defaults to NONE which is no better than where you started, so change it to something above NONE at least!

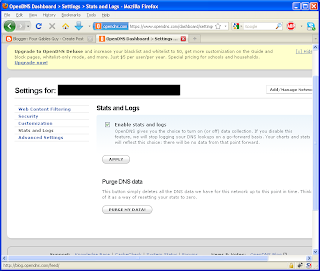
On the left menus, pick Stats and Logs and check the box to enable Stats and Logs and click Apply button. Now all requests from all devices connected to your router are logged! This is good because if someone tried to access explicit web sites, you will be able to see when this occurred and what site was attempted. Keep in mind sometimes sites will show up in the list that the user did not intend to access, they may have gone to espn.com and an advertiser pulled an ad from an explicit site. This ad would be blocked and show up in the log. So don't automatically ground someone for a week because of a log entry.
Hope this helps you out.

1 comment:
Hi Harley,
Thanks for this great overview of OpenDNS. One of the benefits, as you outline, is that isn't isn't device specific — one you set it up on a network, every device on that network from an iTouch to an XBOX is protected.
If you or your readers ever have any questions about OpenDNS, please don't hesitate to get in touch.
Thanks!
-Laura
OpenDNS.com
Post a Comment